TL;DR
A closet can become a great recording space when you combine reflection control, strategic placement, and proper ventilation. Isolation and absorption work hand-in-hand, but the biggest gains come from smart positioning and sealing gaps. You don’t need a perfect room — just the right approach.
Ever stared at a tiny closet and wondered if it could become your go-to voice booth or workspace? The truth is, with a few smart tricks, that cramped space can transform into a surprisingly effective studio. It’s not about endless foam or sealing every crack — it’s about understanding how sound moves and where to focus your efforts.
This guide shows you how to use placement, absorption, and DIY fixes to tame echoes, reduce noise, and keep your rig cool. Whether you’re recording vocals or managing a high-power AI workstation, you’ll learn how to make your closet work for you — without turning it into a soundproof bunker.
Acoustic dampening
& the rig in the closet.
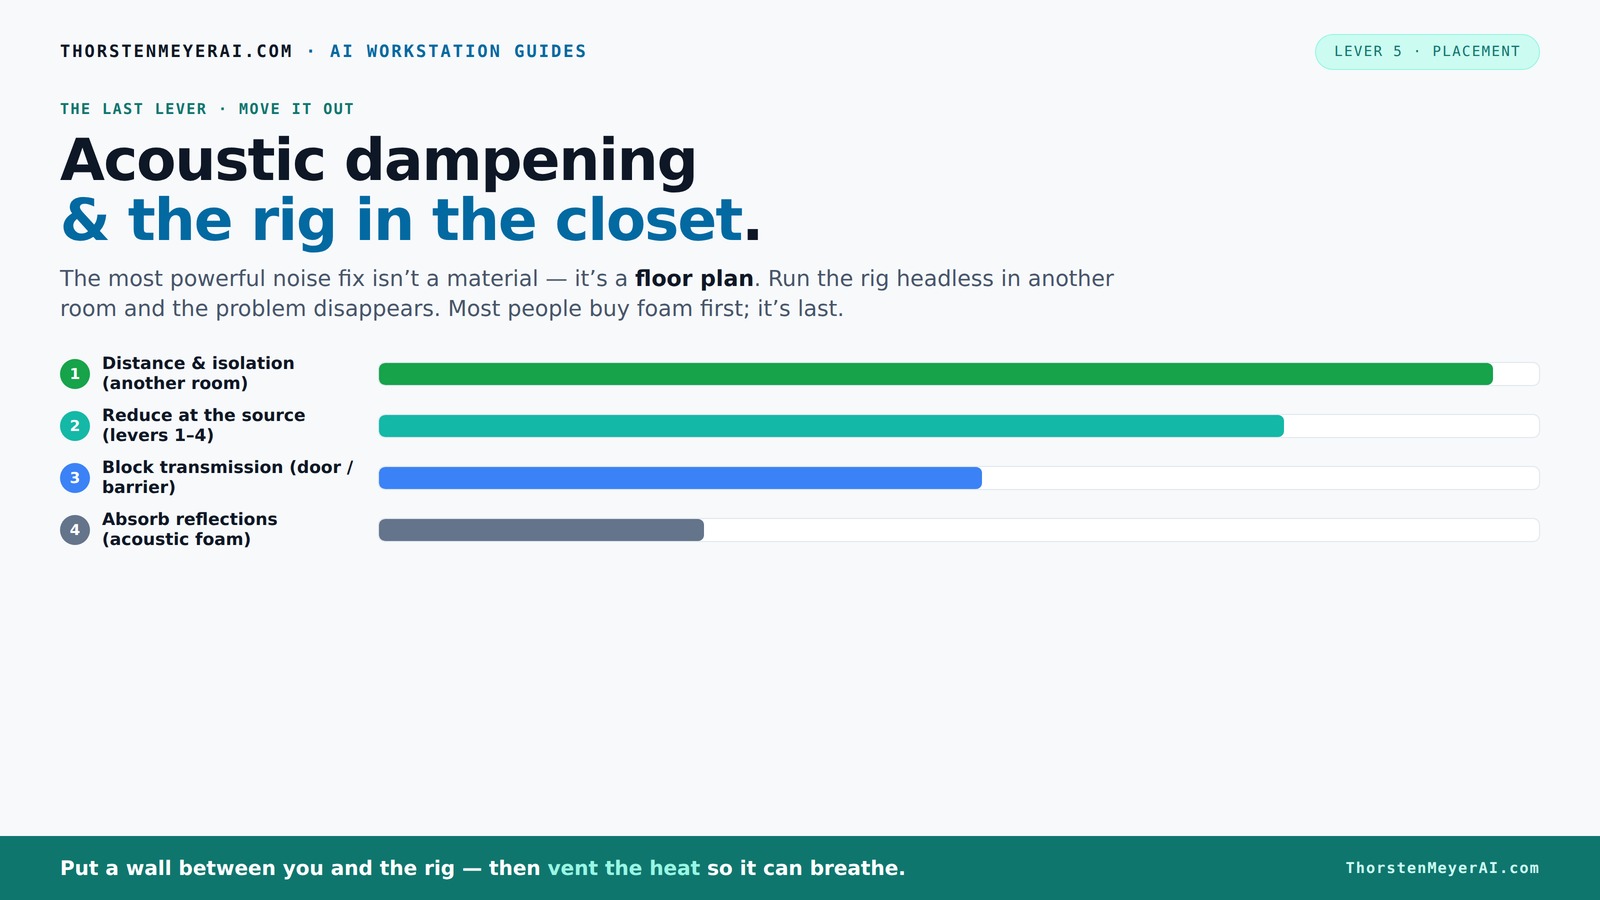
The most powerful noise fix isn’t a material — it’s a floor plan. A rig you can’t hear because it’s in another room beats any amount of foam. Tap the approaches in Part 1 to see what actually works.
(another room)
(levers 1–4)
(door / barrier)
(acoustic foam)
Contain the noise, not the heat
Key Takeaways
- The best noise reduction comes from moving your equipment into a different room or closet, not just buying foam.
- Proper ventilation is critical — sealed closets trap heat, which can damage hardware and increase noise from fans.
- Target the first reflection points with absorption and place bass traps in corners to control low frequencies.
- Sealing gaps and adding mass to walls or doors greatly improves soundproofing, beyond just absorbing sound inside.
- DIY fixes like blankets, rugs, and foam panels can dramatically improve your space at a low cost, especially when combined with sealing.

Focusound 52 Pack Acoustic Foam Panels 1" x 12" x 12" Sound Proof Foam Panles Soundproofing Noise Cancelling Wedge Panels for Home Office Recoding Studio with 300PCS Double-Side Adhesive
- Soundproofing Design: Triangular grooves for noise absorption
- Includes Adhesive Tape: 300pcs double-sided adhesive for easy installation
- Easy Shape Recovery: Soak in water to restore shape within 48 hours
As an affiliate, we earn on qualifying purchases.
As an affiliate, we earn on qualifying purchases.
Why Placement Is Your First and Best Noise Fix
Moving your rig or microphone into the right spot can cut noise and reflections faster than any foam panel. Think of it like tuning a musical instrument — a small shift can make a big difference.
For a closet setup, positioning your mic at the right distance from walls and choosing the best spot for the machine can drastically reduce echo and sound leakage. For example, placing the rig near the wall behind your mic — the so-called "first reflection point" — minimizes early reflections bouncing into your recording. Plus, keeping the rig away from your desk or workspace keeps noise out of your ears.
In practice, if your AI rig is in a closet on the other side of the house, your physical distance alone already reduces noise by up to 80%. This is why relocating equipment often beats buying foam. A wired network connection becomes vital here, so your rig stays accessible without sacrificing silence.
The ‘Rig in the Closet’ Setup: Ventilation Is the Hidden Key
Placing a noisy, heat-generating machine in a closet sounds perfect for silence — until heat builds up. Trapped heat can turn your quiet closet into a hotbox, forcing your fans to spin faster, which defeats the purpose.
The secret to success? Ventilation. You need at least passive vents or, better yet, an exhaust fan pulling hot air out. This keeps temperatures in check and preserves the silence.
For high-performance rigs, a purpose-built soundproof cabinet with ducted airflow or an active cooling system is a game changer. These units combine soundproofing with proper heat dissipation, allowing your rig to run cool and quiet. Check out systems that export heat out with radiator-based cooling — they keep noise down and components happy [3].
How to Use Absorption to Tame Closet Reflections and Boomy Low End
Acoustic dampening isn’t about silence — it’s about controlling echoes and low-frequency buildup. In a tiny closet, parallel walls bounce sound back and forth, creating a boxy, boomy effect that ruins clarity.
Effective absorption targets the first reflection points — the spots where sound hits walls first. Learn more about acoustic dampening techniques. Placing panels there cuts early reflections and clears up your recordings. For low frequencies, thicker bass traps in corners are essential. These absorb the bass rumble that often makes small rooms sound muddy and overbearing.
For example, a DIY approach might involve hanging thick blankets or buying affordable foam panels that focus on the ceiling and behind the mic. Combining absorption at reflection points with bass traps transforms a boxy closet into a smoother-sounding space [2][4].
Seal Gaps and Add Mass: The Foundation of Soundproofing in Small Spaces
Acoustic treatment alone won’t block noise from leaking out or coming in. Soundproofing is about sealing gaps and adding mass — think of it like making your closet a solid sound barrier.
Start by sealing cracks around the door with weatherstripping or acoustic sealant. Heavy doors, extra drywall, and damping compounds like Green Glue help block sound transmission. For a closet, adding mass to walls or even lining the door with mass-loaded vinyl reduces sound leakage significantly.
For instance, sealing every crack can improve sound isolation by 10-20 dB, making your closet much quieter to the outside world. Remember: the goal is not just absorption but blocking sound paths [1][3].
DIY Tips for Turning Your Closet into a Quiet Studio
On a budget? No problem. Combining simple DIY fixes can make a big difference without breaking the bank.
- Use thick blankets and rugs to absorb reflections and reduce echo.
- Place foam panels or reflection filters near your mic’s first reflection points.
- Seal the door with weatherstripping or draft stoppers to cut sound leaks.
- Build or buy a small vented enclosure with ducting and a quiet fan for heat and noise management.
- Position your mic carefully — avoid placing it directly facing parallel walls.
In practice, many creators start with these low-cost solutions and upgrade over time. Combining blankets and foam, plus sealing gaps, often yields >80% of the benefit of high-end treatments.
Avoid Common Pitfalls: What Not to Do When Setting Up Your Closet Studio
Many DIYers fall into traps that undo their efforts. Common mistakes include over-treating — covering every surface — which causes dead zones and makes the space sound unnatural. For more tips, see acoustic treatment advice. Or sealing the space too tightly without ventilation, leading to overheating and equipment failure.
Another mistake is ignoring the importance of placement. Treating only the ceiling or just the walls without focusing on reflection points can leave echoes intact. And don’t forget to check for low-frequency buildup in corners — a frequent cause of that “boomy” sound.
Remember: your goal is balanced sound, not dead silence. Too much absorption can make recordings dull and unnatural.
Conclusion
Transforming a closet into a quiet, functional studio isn’t about perfect acoustics — it’s about smart placement, targeted absorption, and good ventilation. Think of your closet as a blank slate where small adjustments make a huge difference. When you control reflections, block sound leaks, and keep heat at bay, you turn a cramped space into a powerful tool.
So, next time you consider noise or echo, remember: distance plus clever DIY tweaks beat endless foam panels. Your ideal closet studio is just a few strategic steps away — quiet, cool, and ready for your next project.